“Programs must be written for people to read, and only incidentally for machines to execute.” ― Harold Abelson
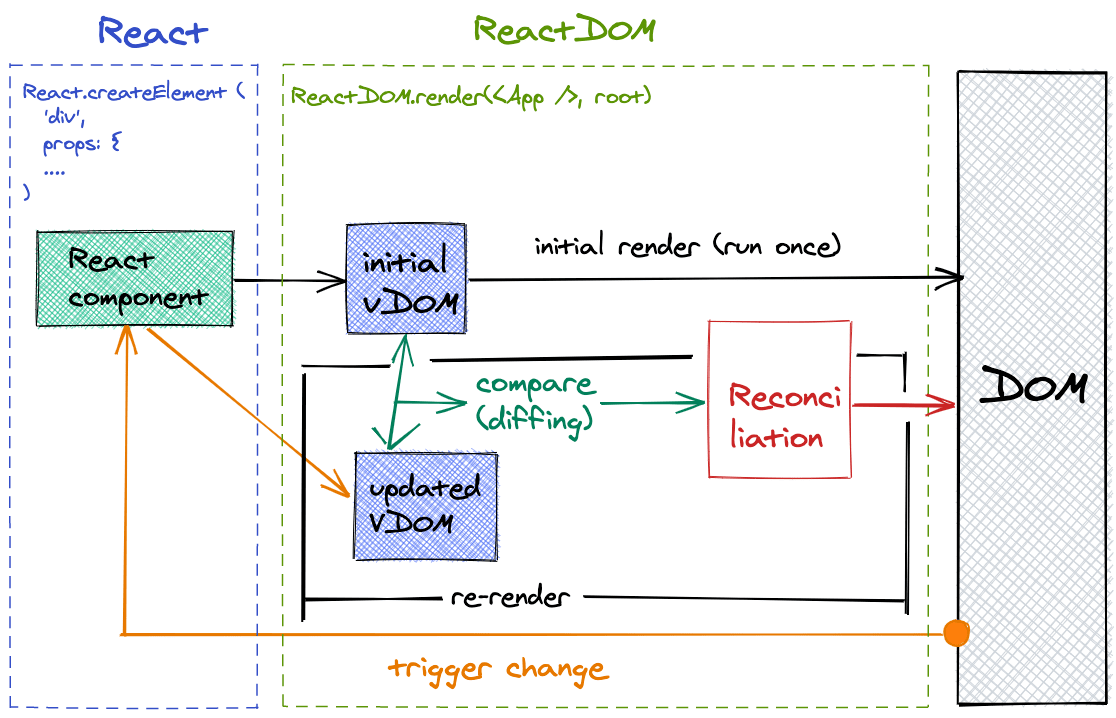
The React framework user must be familiar with the term render. A process of 'painting' React component to Document Object Model (DOM) that can be understood by the browser then displayed on the screen.
To better understand what render is and also how a component is re-rendered, we should first understand how the render process takes place, starting from the beginning.
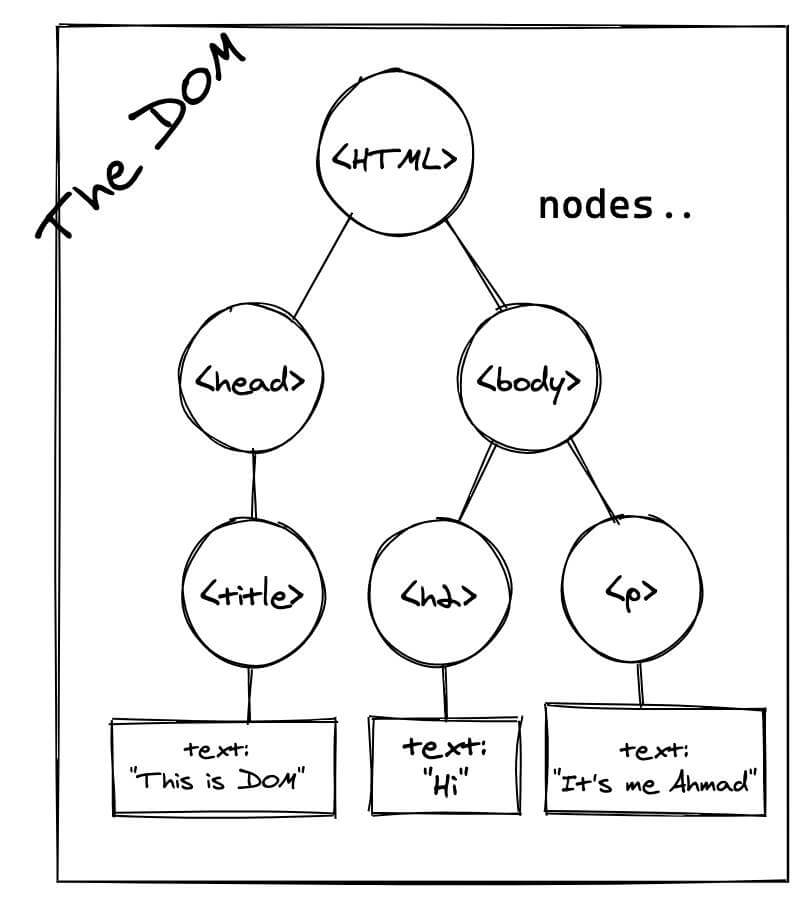
Document Object Model
The web interface that we see on a website is a combination of many DOM nodes. In each node, there is a representation of each element in the HTML or XML source code, such as body, h1, or blockquote.
DOM has a structure like a tree that has many branches. At the very top, there is the main element that is the father, for many child branches below it.
The existence of the DOM allows us to manipulate the appearance and data on the web with Javascript, without the need to refresh web pages. This feature comes with a cost. When we manipulate a node on the DOM, the reflow and repaint process will occur which affects almost all parts of the website.
Reflow is the process when the browser recalculates the layout changes after manipulation. For example, when we change display of an element from block tonone. This will affect the space on the screen, triggering the reflow process to set the place of other elements after the change.
The layout which has been rearranged can then be repainted, aka placing the existing elements, on the available layout. This reflow and repaint process occur at least once when the website is first accessed [1].
Virtual DOM, A smart painter
Doing an update on the DOM that has a few UI components is not a problem, the browser should have its optimization system that makes this process fast.
However, if there are thousands of components on a page, the reflow and repaint processes on the DOM will take longer. We need to do optimization or other tricks so that web performance remains optimal.
This is where the concept of Virtual DOM comes, which is considered to have better performance than real DOM. The Virtual DOM is actually an ordinary Javascript object, which represents a DOM. Suppose we have <div id="app"></div> node on the DOM, then we can represent it as an object like this:
const vApp = {
  type: "div",
  props: {
    id: "app",
  },
};
The key naming inside the object is up to you. There are no specific rules about how the Virtual DOM should look. As long as it represents a DOM, it is a Virtual DOM. If you are interested in making a simple Virtual DOM, please read this tutorial from Jason Wu.
Back to the topic, why Virtual_DOM became a strategy to make the DOM change process faster. When a React component is processed by the ReactDOM.render () function, a copy, or snapshot in the form of Virtual DOM will be created from the component.
After that, the modified component will be rendered or translated into DOM and can be displayed in the browser. If there is a state change to the component via an event that occurs in the DOM. React will create another Virtual DOM object that represents the change.
For example, in the beginning, we display a list with two items, React will create its snapshot in the form of Virtual DOM
// the initial condition of a component, in the form of Virtual DOM
const vUl = {
  type: "ul",
  props: { className: "list-style" },
  children: [
    { type: "li", children: ["number 1"] },
    { type: "li", children: ["number 2"] },
  ],
};
After the initial render process is done, the component is displayed in the browser. Then in the DOM, there is an event that changes state on the component and affects the number of the list that exists. Here, React will create a new Virtual DOM based on the conditions after the state change.
// condition after adding data to the list
const vUl = {
  type: "ul",
  props: { className: "list-style" },
  children: [
    { type: "li", children: ["number 1"] },
    { type: "li", children: ["number 2"] },
    { type: "li", children: ["number 3"] },
  ],
};
The two objects above will then be compared via the diffing process, to determine the location of the difference and calculate the best method for changing the DOM.
The results of diffing contain instructions on how to make changes to the DOM, which are then implemented efficiently, by only changing the parts needed in the Reconciliation process.

To get the idea, I made a simulation with React to display a list that will increase every one second. When we look at the DOM, the li element will increase one by one, and there will be no repaint on the entire page for each change.
To see the repaint process happening, you can enable paint flashing feature on Chrome DevTools. Blinking green light will indicate which part was added to the DOM. Try the code for the gif above here
Diffing algorithm
re-render is the process that will occur when state or props in a component changes. The re-render doesn't always change the existing DOM. Changes to the DOM are maintained by the diffing process, which determines to what extent manipulation of the DOM needs to occur.
We are almost at the end of the discussion regarding React render. This section only summarizes what is written in the reconciliation and diffing documentation on the ReactJS website.
When rebuilding the DOM after a change occurs, there are several scenarios that occur in diffing, to determine whether or not a DOM is thrown away (tear down), or not.
typeis string, does not change,propsremains the same, so the DOM will not change.
// before
{ type: 'ul', props: { className: 'list-style' }}

// after
{ type: 'ul', props: { className: 'list-style' }}
typeremains the same, butpropschanges. React will only change the different property, and not delete node from the DOM.
// before
{ type: 'ul', props: { className: 'list-style' }}

// after
{ type: 'ul', props: { className: 'list-style-special' }}
typechanges from string to string or to a component. Then the old component will be removed, replaced by a new one (mounting). Here component receivescomponentWillUnmount ()lifecycle, and after the new component is ready, it acceptscomponentWillMount ()thencomponentDidMount ()lifecycle. All state from the old component will be lost.
// before
{ type: 'ul', props: { className: 'list-style' }}

// after
{ type: 'ul', props: { className: 'list-style-special' }}
// or ...
{ type: SomeComponent, props: { className: 'list-style' }}
- Both
typeare component,propsremains the same. Iftypeis both a reference to functional or class component (react component you know). Then React will look deep into each component and do a detailed comparison to determine the changes.
// before
{ type: SebuahList, props: { className: 'list-style' }}

// after
{ type: SebuahList, props: { className: 'list-style-special' }}
React uses two render terms, namely class
render()andReactDOM.render().render()is functions to change the JSX code into a React (Virtual DOM) element, whileReactDOM.render()functions responsible for doing diffing to mounting component to DOM.
There is another scenario that occurs when a component has more than one children.
// ...
children: [{ type: "div" }, { type: "span" }];
// ...
children: [
  { type: "div" },
  { type: "span" },
  { type: "p" }, // only add this element to DOM
];
If the addition of children at the end of the array, React will only add one node or a new element in the DOM. However, if the addition occurs at the beginning, the diffing algorithm will consider it as a different component, and do the tear down of all children to create a new one.
// ...
children: [{ type: "div" }, { type: "span" }];
// ...
children: [
  { type: "p" }, // changes that change order
  { type: "div" },
  { type: "span" },
];
This becomes inefficient in performance, and React always reminds us well when it happens. The warning to provide a key to a component that is iterated, derived from the vulnerability of a complete DOM change happened to the children component.
To overcome this, React can accept the key attribute on children. If children have it, then React will make a comparison on the key provided, not according to the initial sequence of the child component.
That's it, the discussion related to the render process on the React framework. If you have something to discuss, don't hesitate to contact me via Twitter