Some time ago, I just read the weekly newsletter from Cassidy Williams edition #158 where one of the article links discusses Finite State Machine (FSM).
FSM is simply a concept of state management of a machine or application, where there can only be one state at a time, which is useful for controlling what operations can occur or what feedback the machine will give based on certain inputs.
An example of FSM (or sometimes also called Finite Automata) that we often encounter is traffic lights. The traffic light has three states, namely Red, Yellow, and Green, which change according to time.
Another example is an automatic vending machine, which has, perhaps, five states, namely Idle, Ready, Process, Finish, and Error.
In the Idle state, the machine is ready to accept user coins and will go to the Ready state when coins are inserted. Next, the user selects the drink in the Process state, and the machine will process the order. If it fails, for example, the price of the drink does not match the amount of money entered, the machine will go into an Error state, but if successful, the machine will go to a Finish state then take out the drink and return to the Idle state.
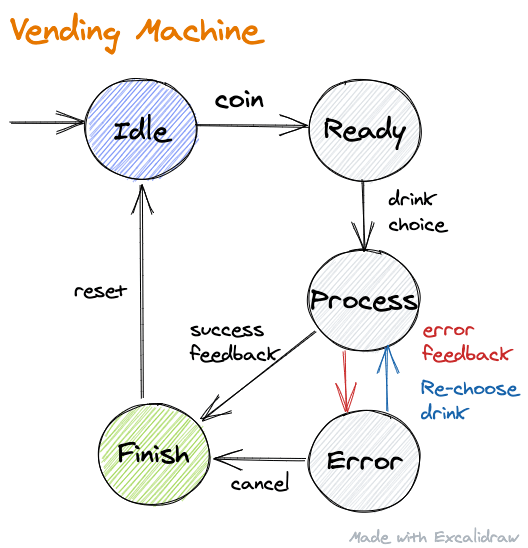
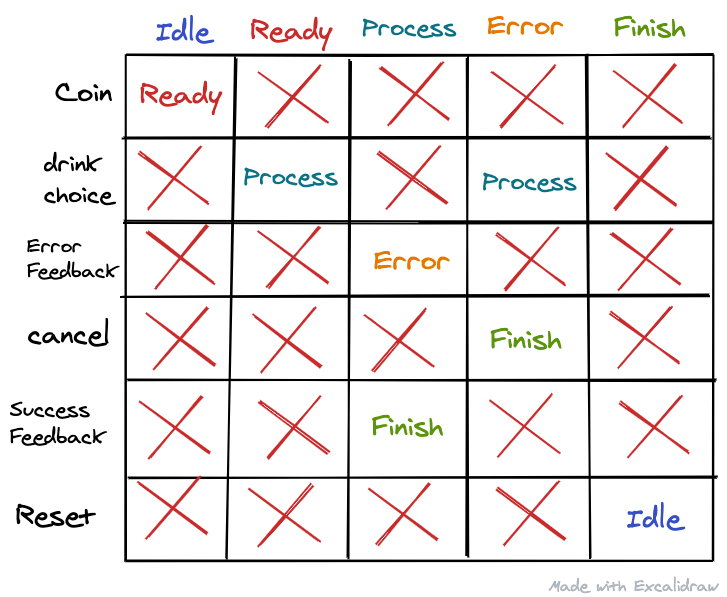
The image above is a simple diagram depicting the flow of the state of a Vending Machine. Some keywords that need to be considered are:
- State, all the states in the machine (Idle, Ready, Process, etc), are symbolized in mathematics by
Q - Inputs, are the trigger to change the state (coin, drink choice, error feedback, etc.), symbolized by
∑ - Initial State, is the initial condition or the first state (Idle), symbolized by
q0 - Final State, the last state (Finish), symbolized by
F - Transition, all state changes that occur due to a particular input with the symbol
T, see the following table
FSM is basically a mathematical computation model that can be applied in various places, one of which is in Javascript programming. There are two libraries that are well known for creating FSM, namely XState and Robot.
Both libraries have almost the same function. Their differences have more to do with syntax, size, and usage paradigm.
Here is the code to create a simple toggle machine that has an active and an inactive state, using both libraries.
// Xstate
const toggleMachine = Machine({
  id: "toggle",
  initial: "inactive",
  states: {
    inactive: {
      on: {
        TOGGLE: "active",
      },
    },
    active: {
      on: {
        TOGGLE: "inactive",
      },
    },
  },
});
// Robot
const toggleMachine = createMachine({
  inactive: state(transition("toggle", "active")),
  active: state(transition("toggle", "inactive")),
});
If you look closely, there are many similarities in the two codes above. Each has State, Input, Transition, Initial State but no Final state (Because this machine is for toggling, so it just go back and forth between the two states).
In order to use the above two machines in the React framework, we need a special adapter provided by both libraries.
As per the title of this article, I will use Robot to create an FSM in React. The robot has an adapter named React-Robot for the integration of the FSM with React. React-Robot provides hooks to run engines built into React components.
import React from "react";
import ReactDOM from "react-dom";
import { createMachine, state, transition } from "robot3";
import { useMachine } from "react-robot";

const machine = createMachine({
  off: state(transition("toggle", "on")),
  on: state(transition("toggle", "off")),
});

function App() {
  const [current, send] = useMachine(machine);

  return (
    <>
      <div>State: {current.name}</div>
      <button onClick={() => send("toggle")}>Toggle</button>
    </>
  );
}

ReactDOM.render(<App />, document.querySelector("#app"));
Above is a complete implementation of FSM on React components, with functionality to switch between two _state, _ active and inactive.
useMachine hooks run the created machine, and returns two variables current and send. current contains everything regarding the current state such as the name and data it has. send is a function to give input which will change the state of the machine, which in the code above is 'toggle' string.
At any time the Toggle Button is clicked, the machine will switch from the active and inactive state, if and only if, the input is given as required. The state will not change if, for example, we replace input with the string 'Yahoo'.
Next, we will try to create a sign-in page whose process will use FSM to manage state and http requests to the API.
Create Sign In page and integration with Robot
For this experiment, I will use Codesandbox, a simple tool that allows us to create mini-projects using various Javascript frameworks, including React.

First, install all the required libraries. Click on the add dependency button on the left side of the page, then the page will appear as the above picture. Find and install the following 3 modules robot3, react-robot, lastly, axios to do http request.
After everything is installed, we start by creating a simple sign-in form in the App.js file.
import React, { useState } from "react";
import "./styles.css";

export default function App() {
  const [credential, setCredential] = useState({ email: "", password: "" });

  function handleChange(e) {
    const { name, value } = e.target;
    setCredential((current) => ({ ...current, [name]: value }));
  }

  function handleSubmit(e) {
    e.preventDefault();
  }

  return (
    <div className="App">
      <h1>Sign in</h1>
      <form onSubmit={handleSubmit}>
        <input
          placeholder="email"
          value={credential.email}
          name="email"
          onChange={handleChange}
        />
        <input
          placeholder="password"
          value={credential.password}
          type="password"
          name="password"
          onChange={handleChange}
        />
        <button type="submit">Sign In</button>
      </form>
    </div>
  );
}
Next, we create a machine that will handle a request to the API and state in the previous form. The states needed for this sign-in scenario is roughly four kinds: idle, loading, error, success. From these names, you can imagine what happened to each of them. We make the machine in machine.js file first, and later I will explain it below
import { createMachine, state, transition, invoke, reduce } from "robot3";

const context = () => ({
  result: "",
  error: "",
});

export const machine = (request) =>
  createMachine(
    {
      ready: state(transition("click", "loading")),
      loading: invoke(
        (ctx, evt) => request(evt.data),
        transition(
          "done",
          "success",
          reduce((ctx, evt) => ({ ...ctx, result: evt.data }))
        ),
        transition(
          "error",
          "error",
          reduce((ctx, evt) => ({ ...ctx, error: evt.error }))
        )
      ),
      success: state(),
      error: state(transition("click", "loading")),
    },
    context
  );
At the very top of the code I imported the functions needed to assemble the engine for sign in.
Next, I created a function called context which has a return value of an object with the result and error properties. This Context will be a place to store data responses and errors from http request.
Continue to the core part, the FSM, let's review it from the beginning:
- First, we create the machine via the
createMachinefunction with an object argument containing the state and the operation to be executed. - Create ready state which will be transitioned to state loading when
"click'input' is given. - Create loading state. Inside it, we use the
invokefunction to execute the request that will be sent to the server. Since we are making a sign-in request, it is necessary to send the user credential obtained from the parameterevt. - Furthermore, if the request is successful, marked with input or trigger
" done", then the state will move to success and the machine will replace the value of the result property incontext, with the data obtained from the request. - Otherwise, when the request fails, we will switch to error state, and the error response from the API will be put into the
context. - When we are in error state, we can make a request again, because there is a transition back to loading state. But on success state, we won't be able to do any activities, because there is no transition there (and indeed if the sign-in is successful you should have moved to another page already)
Finally, we put context as the second argument of createMachine (or you can also just create an anonymous function here. However, to make the code easier to understand, I created it in a dedicated variable).
OK, we are at the most thrilling stage of integrating our machine with the previously created forms. Similar to the previous machine usage example, we will use useMachine hooks to run the machine, the following is integrated App.js
import React, { useState, useEffect } from "react";
import { useMachine } from "react-robot";
import axios from "axios";

import "./styles.css";

import { machine } from "./machine";
const signInApi = (data) => axios.post("https://reqres.in/api/login", data);
const signInMachine = machine(signInApi);

export default function App() {
  const [current, send] = useMachine(signInMachine);
  const { result, error } = current.context;
  const [credential, setCredential] = useState({ email: "", password: "" });

  function handleChange(e) {
    const { name, value } = e.target;
    setCredential((current) => ({ ...current, [name]: value }));
  }

  function handleSubmit(e) {
    e.preventDefault();
    send({ type: "click", data: credential });
  }

  // to check success state
  useEffect(() => {
    if (current.name === "success") {
      console.log(result);
    }
  }, [current.name]);

  return (
    <div className="App">
      <h1>Sign in</h1>

      {current.name === "error" && <h3>{error.message}</h3>}
      {current.name === "success" && <h3>Sign In Success</h3>}

      <form onSubmit={handleSubmit}>
        {/* ... input field */}

        <button disabled={current.name === "loading"} type="submit">
          Sign In
        </button>
      </form>
    </div>
  );
}
At the very top of the code now, we import the required library. Then we import the previously created machine and set up the endpoint for the API we want to fetch.
Inside the component, we use the useMachine hooks to start the machine, which gives us two variables, current and send. Then we do a little destructuring on the current variable to get result, the successful http request response, and error if the request fails.
Entering the form, we create a simple alert to inform if the request error or success. Finally, in The Button, we provide disabled props which will prevent the button from functioning if the state is loading.
If all the code above works well, the result is look like this

I used the fake API from reqres.in for this experiment. The first credential I entered was wrong, to test the error state. The second is a valid credential which will get a successful response from the server.
It can be seen that the use of our machines is going well. The button becomes disabled on submit, error message appears, success response is also logged correctly in console.
Maybe for a simple use-case like this it is a bit difficult to feel the benefits of using FSM. But the next time you have to deal with applications that, for example, have six or more states, using FSM will make your state management better.
It can be a bit confusing when we get used to using the term state in React which refers to stored data, with state in the FSM indicating the state, while the data is stored in context.
You can find the code for the above experiment here. After this, I'm going to try to change the machine we previously created into custom hooks with the same functionality, but easier to use.
Make life easier with custom hooks
This time our mission is to change the sign-in machine to simple custom hooks that can be used with other cases (register, reset the password, etc), also access data and functions via more intuitive variables.
Change the machine.js file to be like this:
import { useMemo } from "react";
import { createMachine, state, transition, invoke, reduce } from "robot3";
import { useMachine } from "react-robot";

export function useRequest(request) {
  const context = () => ({
    result: "",
    error: ""
  });

  const machine = createMachine(
    {
			// ... machine
    }
  );

  const requestMachine = useMemo(() => machine, []);

  const [current, send] = useMachine(requestMachine);
  const { result, error } = current.context;

  return {
    state: current.name,
    send,
    result,
    error,
    matches: (state) => current.name === state
  };
At the very top, we import useMemo from React, and useMachine from React-Robot.
Then we renamed the previous function to useRequest to become hooks. The name was up to you, but I used that name because later this hooks will be used to do http requests to the API.
Inside, the context remains the same, the machine is the same, only we need to wrap it in useMemo so that the machine doesn't restart every single component re-render.
Next, the useMachine which was previously used in App.js, we move it here to start the machine. Then do destructuring as before to get state and the request results.
Finally, we need to return state, data, and existing functions, in the form of objects, so that later we are free to use the data or functions needed. Done! easy right? Now we just need to use it on the sign in page. Change App.js as follows:
import React, { useEffect, useState } from "react";
import "./styles.css";
import axios from "axios";
import { useRequest } from "./machine";

const signInAPI = (data) => axios.post("https://reqres.in/api/login", data);

export default function App() {
  const { state, send, result, error, matches } = useRequest(signInAPI);
  const [credential, setCredential] = useState({ email: "", password: "" });

  // ... unchanged

  useEffect(() => {
    if (matches("success")) {
      // redirect to dashboard
      console.log(result);
    }
  }, [state]);

  return (
    <div className="App">
      <h1>Sign in</h1>
      {matches("error") && <h3>{error.message}</h3>}
      {matches("success") && <h3>Sign In Success</h3>}
      <form onSubmit={handleSubmit}>
        {/* ... input field */}

        <button disabled={matches("loading")} type="submit">
          Sign In
        </button>
      </form>
    </div>
  );
}
In the code above, after importing the useRequest hooks, use it with the sign-in endpoint, and do the destructure for the required thing. Next, we make some adjustments such as replacing current.name with state in useEffect. Replace the comparison which originally used === with the matches() function.
When you run it, the result will be the same as the previous one, only this time it's more beautiful 🙂. See the full code for custom hooks here.
That's all for this article. I'm sure there are still a lot of flaws here and there, and I hope that doesn't detract from my original purpose of writing, to know what a Finite State Machine is and its simple implementation in React. If there are criticisms and suggestions, you can submit them via my email or Twitter. Thanks.