

My first child enjoys watching YouTube videos on TV. As a parent, I am responsible for providing appropriate content. Sometimes, I’m not happy with the ads that appear because they’re not kid-friendly, and often the videos autoplay to other children’s content that isn’t Islamic.
Initially, I used a flash drive containing pre-downloaded videos for them to watch. However, the downside is that every time I want to add new videos, I have to unplug the drive and download from another device, copy paste to the drive and re-plug.
Since I had just setup a home server from a used PC, I thought about putting the videos on the server. Later, I could download the videos directly to the server from my laptop via SSH, and the list of videos on the TV would be updated immediately.
In this article, I’ll walk you through the steps I took to set up a media server that can be accessed from a smart TV or any other device connected to the network. To follow the instructions in this article, it’s assumed that the following prerequisites are met:
- A Linux-installed server PC with Docker, connected to the network
- Basic understanding of Linux and using terminal commands
Setting Up the Storage Directory
This directory will later be exposed via the Samba protocol, allowing it to be accessed by any device on the network.
Determine the directory that will be used as the media storage, for example, /mnt/mydisk/media. The /media directory is the folder we will expose to the network. To ensure that the directory and its contents are accessible, you need to change the directory’s permissions using the following command:
sudo chmod -R 775 /mnt/mydisk/media
The command above grants read access to the directory and its contents to all users.
Creating the Project Directory
To keep all configurations in one place for easy access, I created a separate project directory. I’ve set up a GitHub repository that can be cloned directly using the following command:
git clone https://github.com/muhsalaa/docker-samba-server.git
After cloning is successful, navigate into the directory and adjust the configurations to fit your setup. There are three configuration files that need to be modified, and here are explanations for each:
smb.conf
[global]
    workgroup = SAMBA
    erver string = Samba Server
    security = user
    min protocol = SMB2
    passdb backend = tdbsam
    log file = /var/log/samba/%m.log
    max log size = 50
    socket options = TCP_NODELAY IPTOS_LOWDELAY
    read raw = yes

[media]
    path = /mnt/mydisk/media
    browseable = yes
    read only = yes
    guest ok = no
The above is a template Samba configuration that will be run on the server. Below are the key configurations to modify:
[global] min protocol: The minimum Samba protocol version to use. If the TV or device accessing the server uses Samba version 1, remove this configuration.[media]: This is the name of the directory for the Samba server that will be connected from an application. You can change it if needed.[media] path: You can change this path directory, but make sure to update it in both the Dockerfile and docker-compose.yml files as well.
For other configurations, refer to the Samba configuration cheatsheet.
Dockerfile
FROM alpine:3.20

# Install Samba and necessary utilities
RUN apk add --no-cache samba samba-common-tools

# Define build-time arguments
ARG SAMBA_USER
ARG SAMBA_PASSWORD

# Create and configure Samba user
RUN adduser -D -H -s /sbin/nologin ${SAMBA_USER} && \
    echo "${SAMBA_USER}:${SAMBA_PASSWORD}" | chpasswd && \
    (echo "${SAMBA_PASSWORD}"; echo "${SAMBA_PASSWORD}") | smbpasswd -s -a ${SAMBA_USER}

# Copy Samba configuration file
COPY smb.conf /etc/samba/smb.conf

# Set up the media directory and permissions
RUN mkdir -p /mnt/mydisk/media && \
    chown -R ${SAMBA_USER}:${SAMBA_USER} /mnt/mydisk/media

# Expose Samba ports
EXPOSE 139 445

# Start Samba service in the foreground
CMD ["smbd", "--foreground", "--no-process-group"]
No changes are needed in the Dockerfile above. The directory path /mnt/mydisk/media can be changed, but ensure you update it in the docker-compose.yml and smb.conf files as well.
This Dockerfile creates a container based on Alpine Linux that will host the Samba server.
docker-compose.yml
services:
  samba:
    build:
      context: .
      dockerfile: Dockerfile
      args:
        SAMBA_USER: youruser
        SAMBA_PASSWORD: yourpassword
    container_name: samba-server
    ports:
      - "139:139"
      - "445:445"
    volumes:
      - /path/to/media:/mnt/mydisk/media
    restart: unless-stopped
Lastly, there’s the docker-compose.yml file, which contains the commands for creating a container from the Dockerfile. The following details need to be updated:
SAMBA_USERandSAMBA_PASSWORD: Set these as desired./path/to/media: Replace the volume path with the directory created earlier (where the media files are stored on the server). If you changed the path in Dockerfile or smb.conf, adjust the/mnt/mydisk/mediapath accordingly.
Running the Samba Service
Once the media directory and project are ready, it’s time to run the prepared Samba container. Navigate to the project directory and run:
docker compose up -d
Opening Firewall Ports 139 and 445
To ensure the Samba server ports are accessible by devices on the network, you need to open firewall access to ports 139 and 445 (this step can be skipped if there’s no firewall installed on the server). Here’s the sequence of commands to open the firewall ports on AlmaLinux, which I’m using:
sudo firewall-cmd --permanent --add-port=139/tcp
sudo firewall-cmd --permanent --add-port=445/tcp
sudo firewall-cmd --reload
For other Linux distributions like Ubuntu, use the following commands:
sudo ufw allow 139/tcp
sudo ufw allow 445/tcp
sudo ufw reload
At this point, the Samba server should be accessible from any smartphone or smart TV connected to the network.
Accessing Media with VLC on a Smart TV
There are many apps available for accessing media files from a server on a smart TV or smartphone: Kodi, MX Player, VLC, etc. For a better user interface, you can use Kodi. However, I’ll be using VLC this time, as it’s easier to connect.
I’ll use screenshots from the VLC app on my phone as an illustration. Here are the steps:
Create a New Favorite Server
Open the VLC app and go to the Browse menu. Then, click the three dots in the top-right corner and select Add a server favorite.
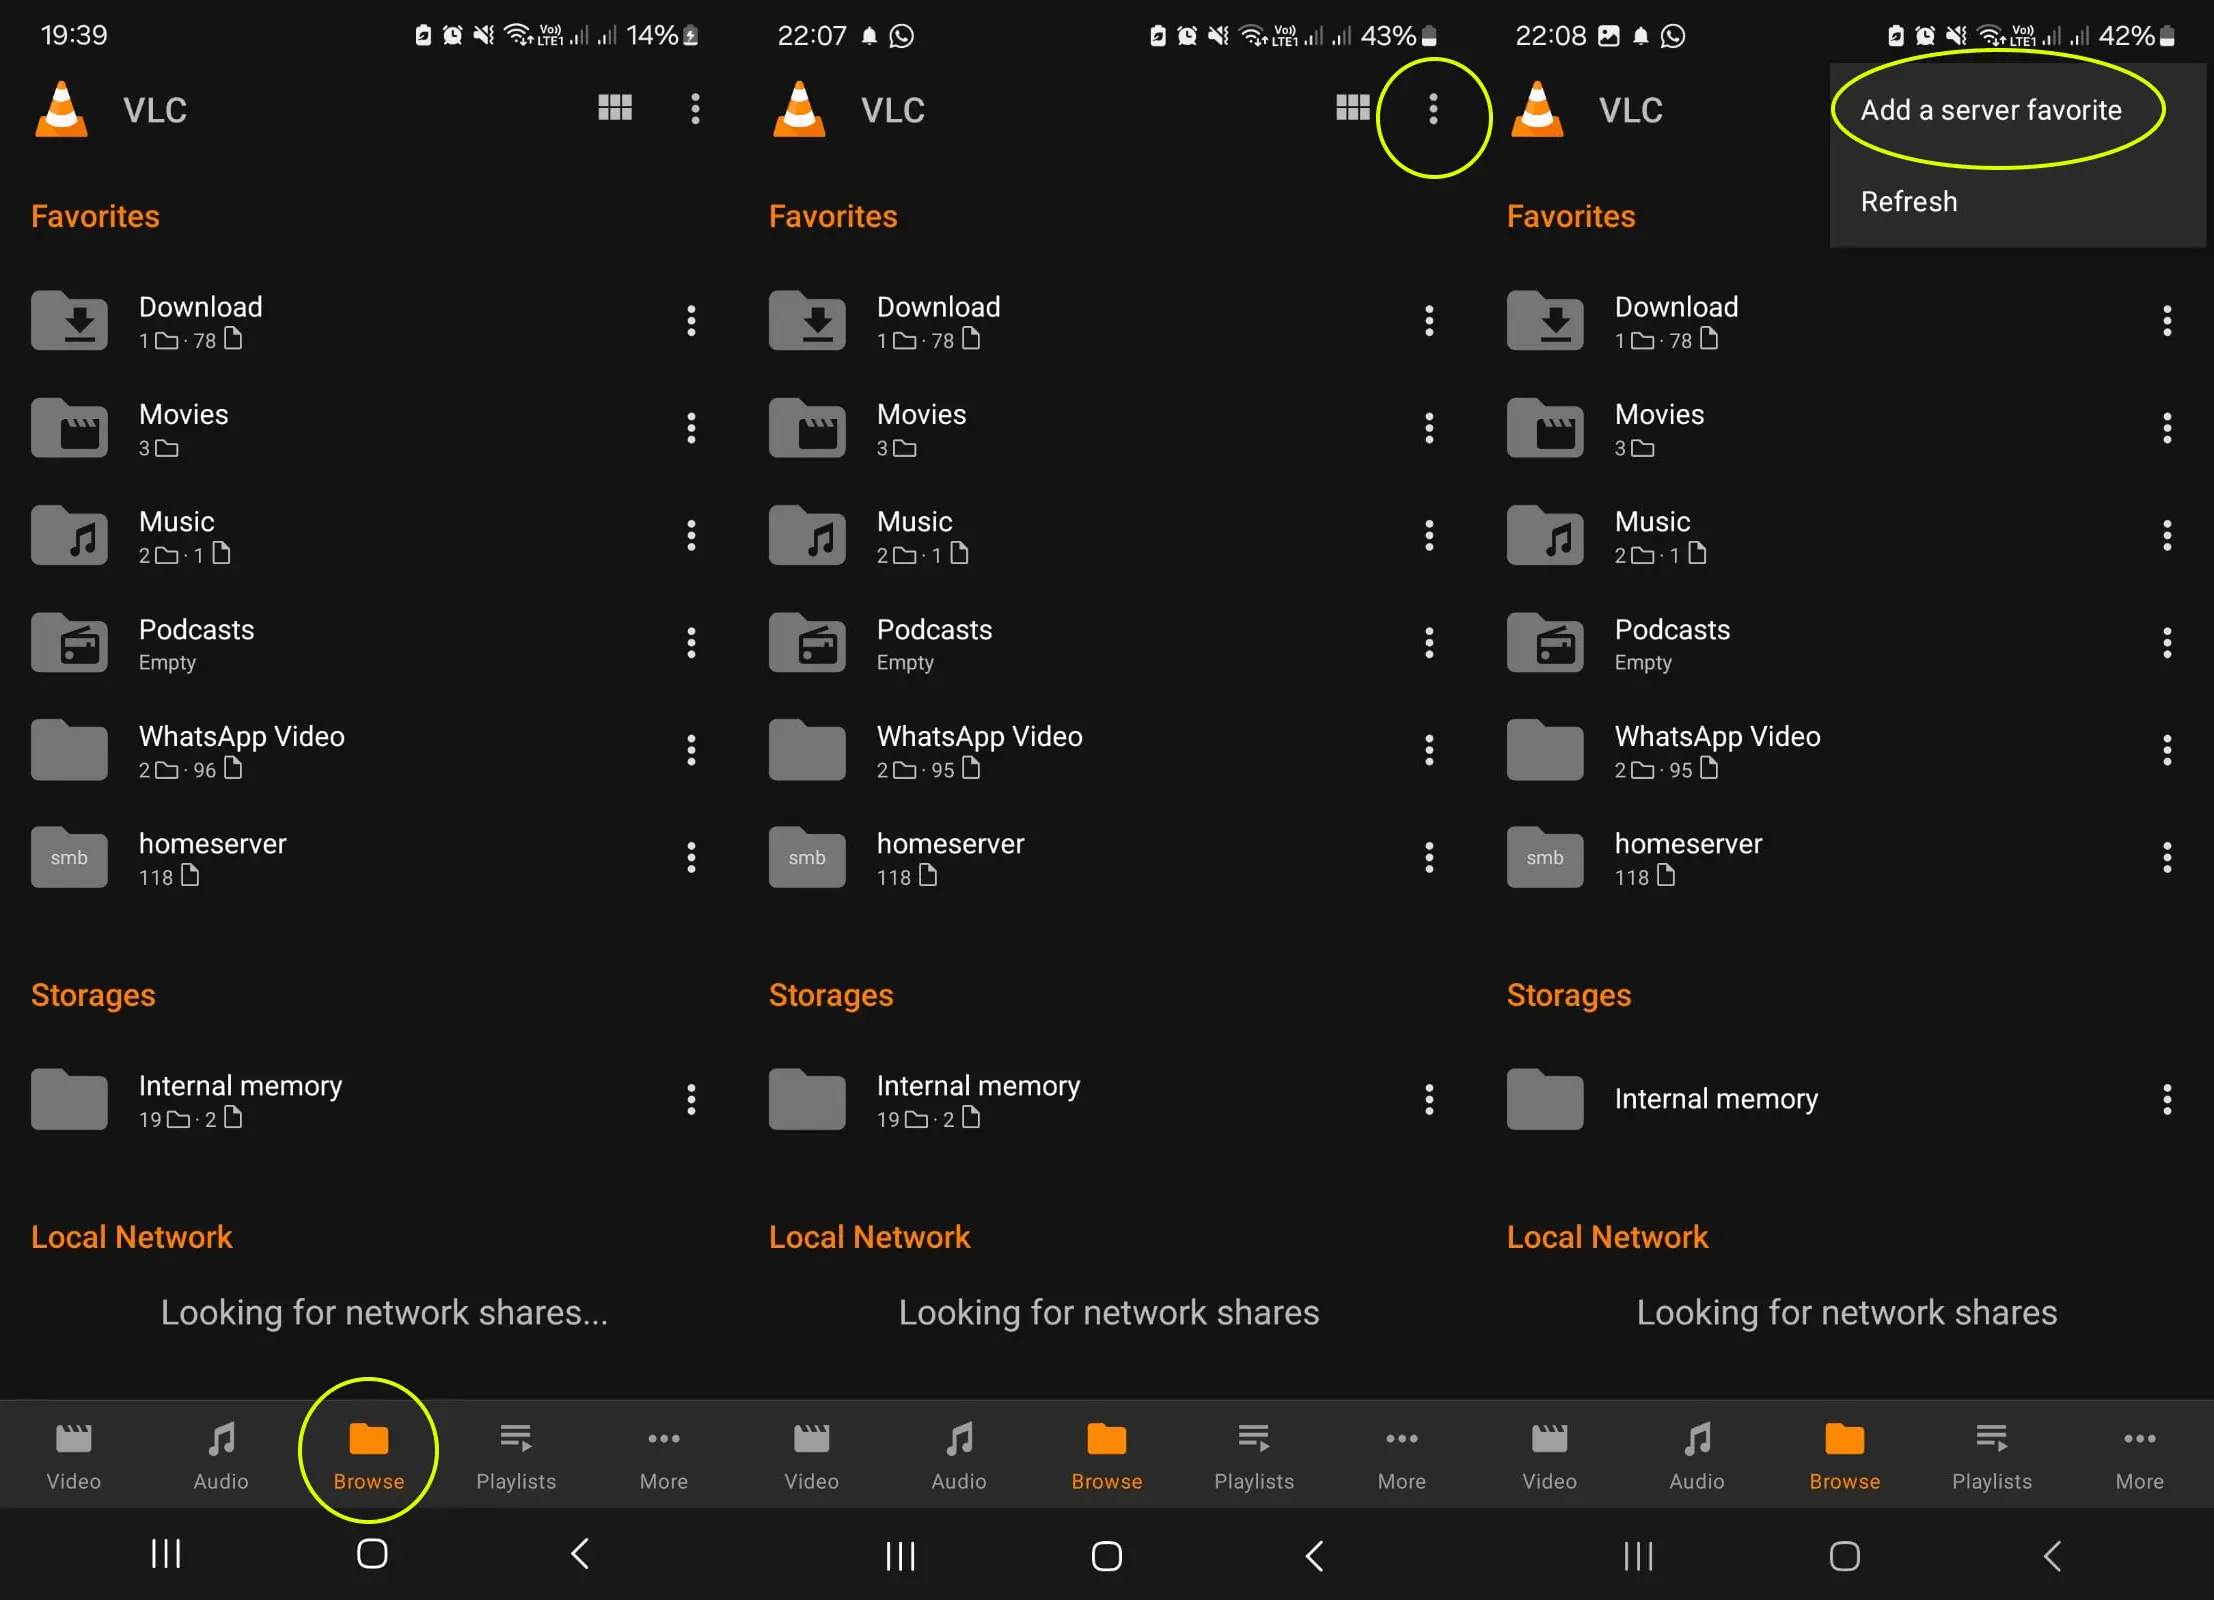
Fill in the Server Configuration Details
Enter the server configuration details as needed:
- Network share name: Enter the IP address of the server PC.
- Folder path: Enter the directory name specified in the Samba configuration (in this case,
/media, as defined in the Samba configuration[media]). - Server name: This is the name that will appear in the VLC app.
After filling in the details, click OK. Then, click the three dots again and select Edit, enter the username from the SAMBA_USER configuration in the docker-compose.yml file, and press OK.
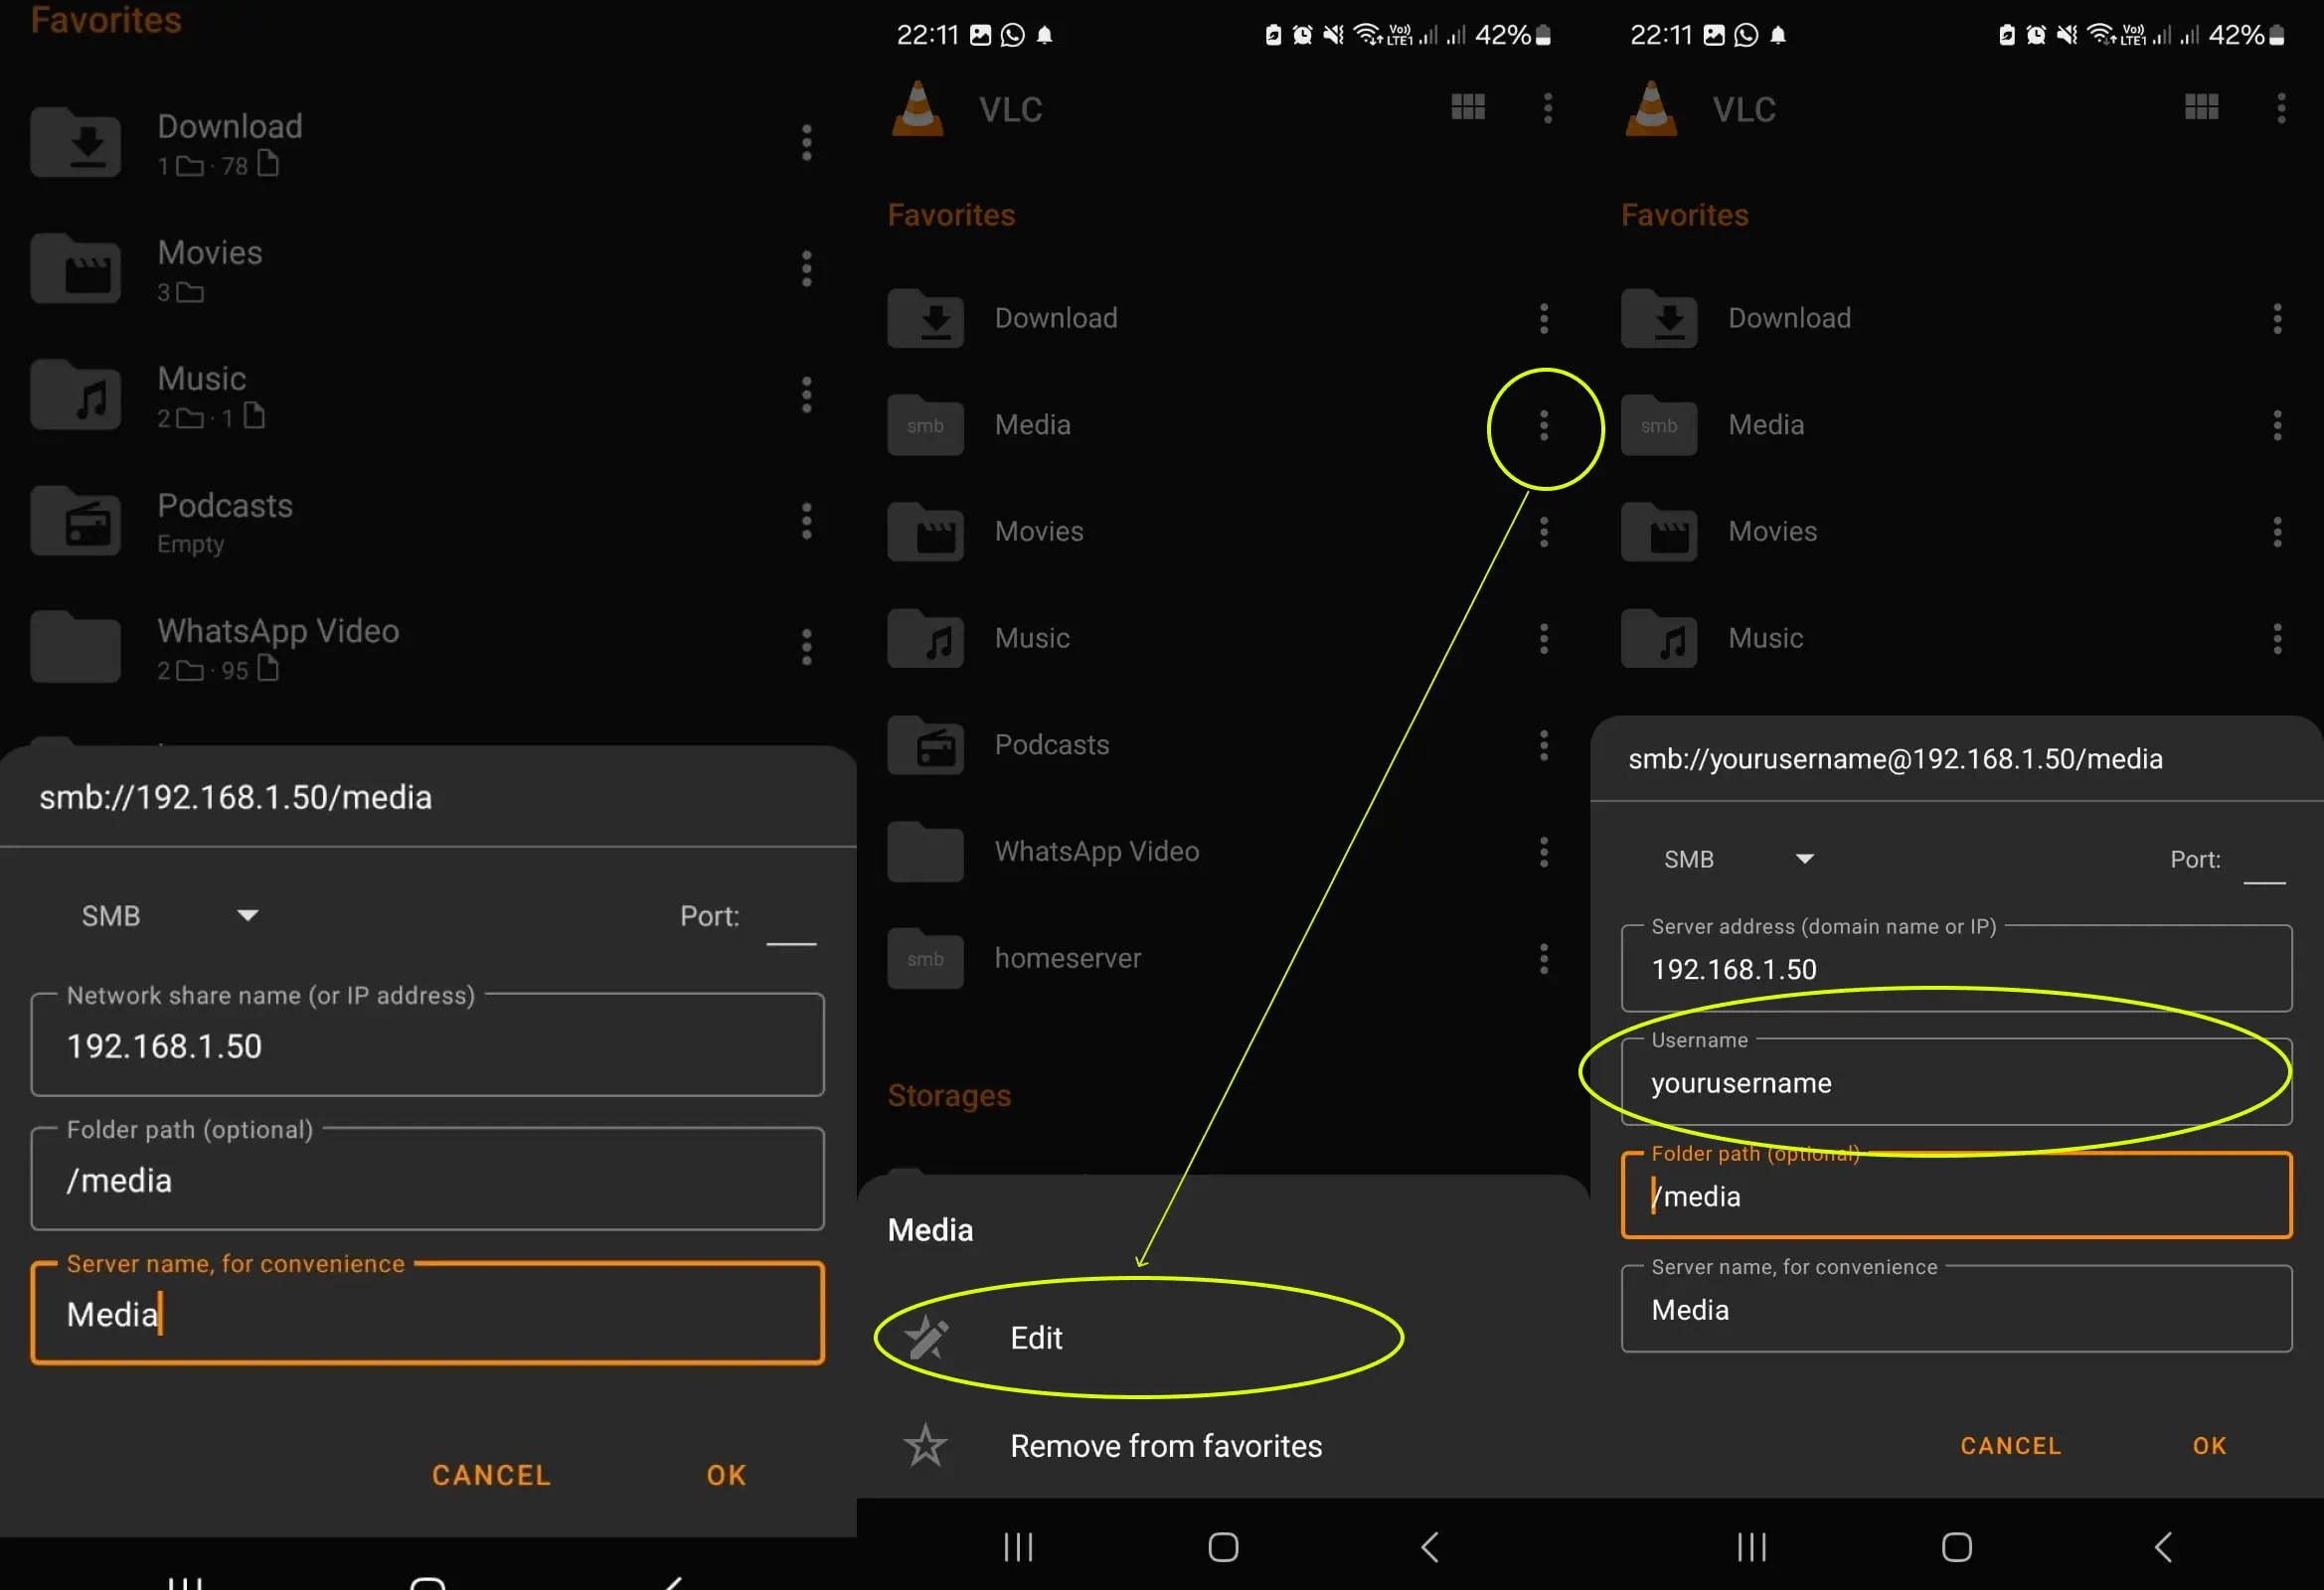
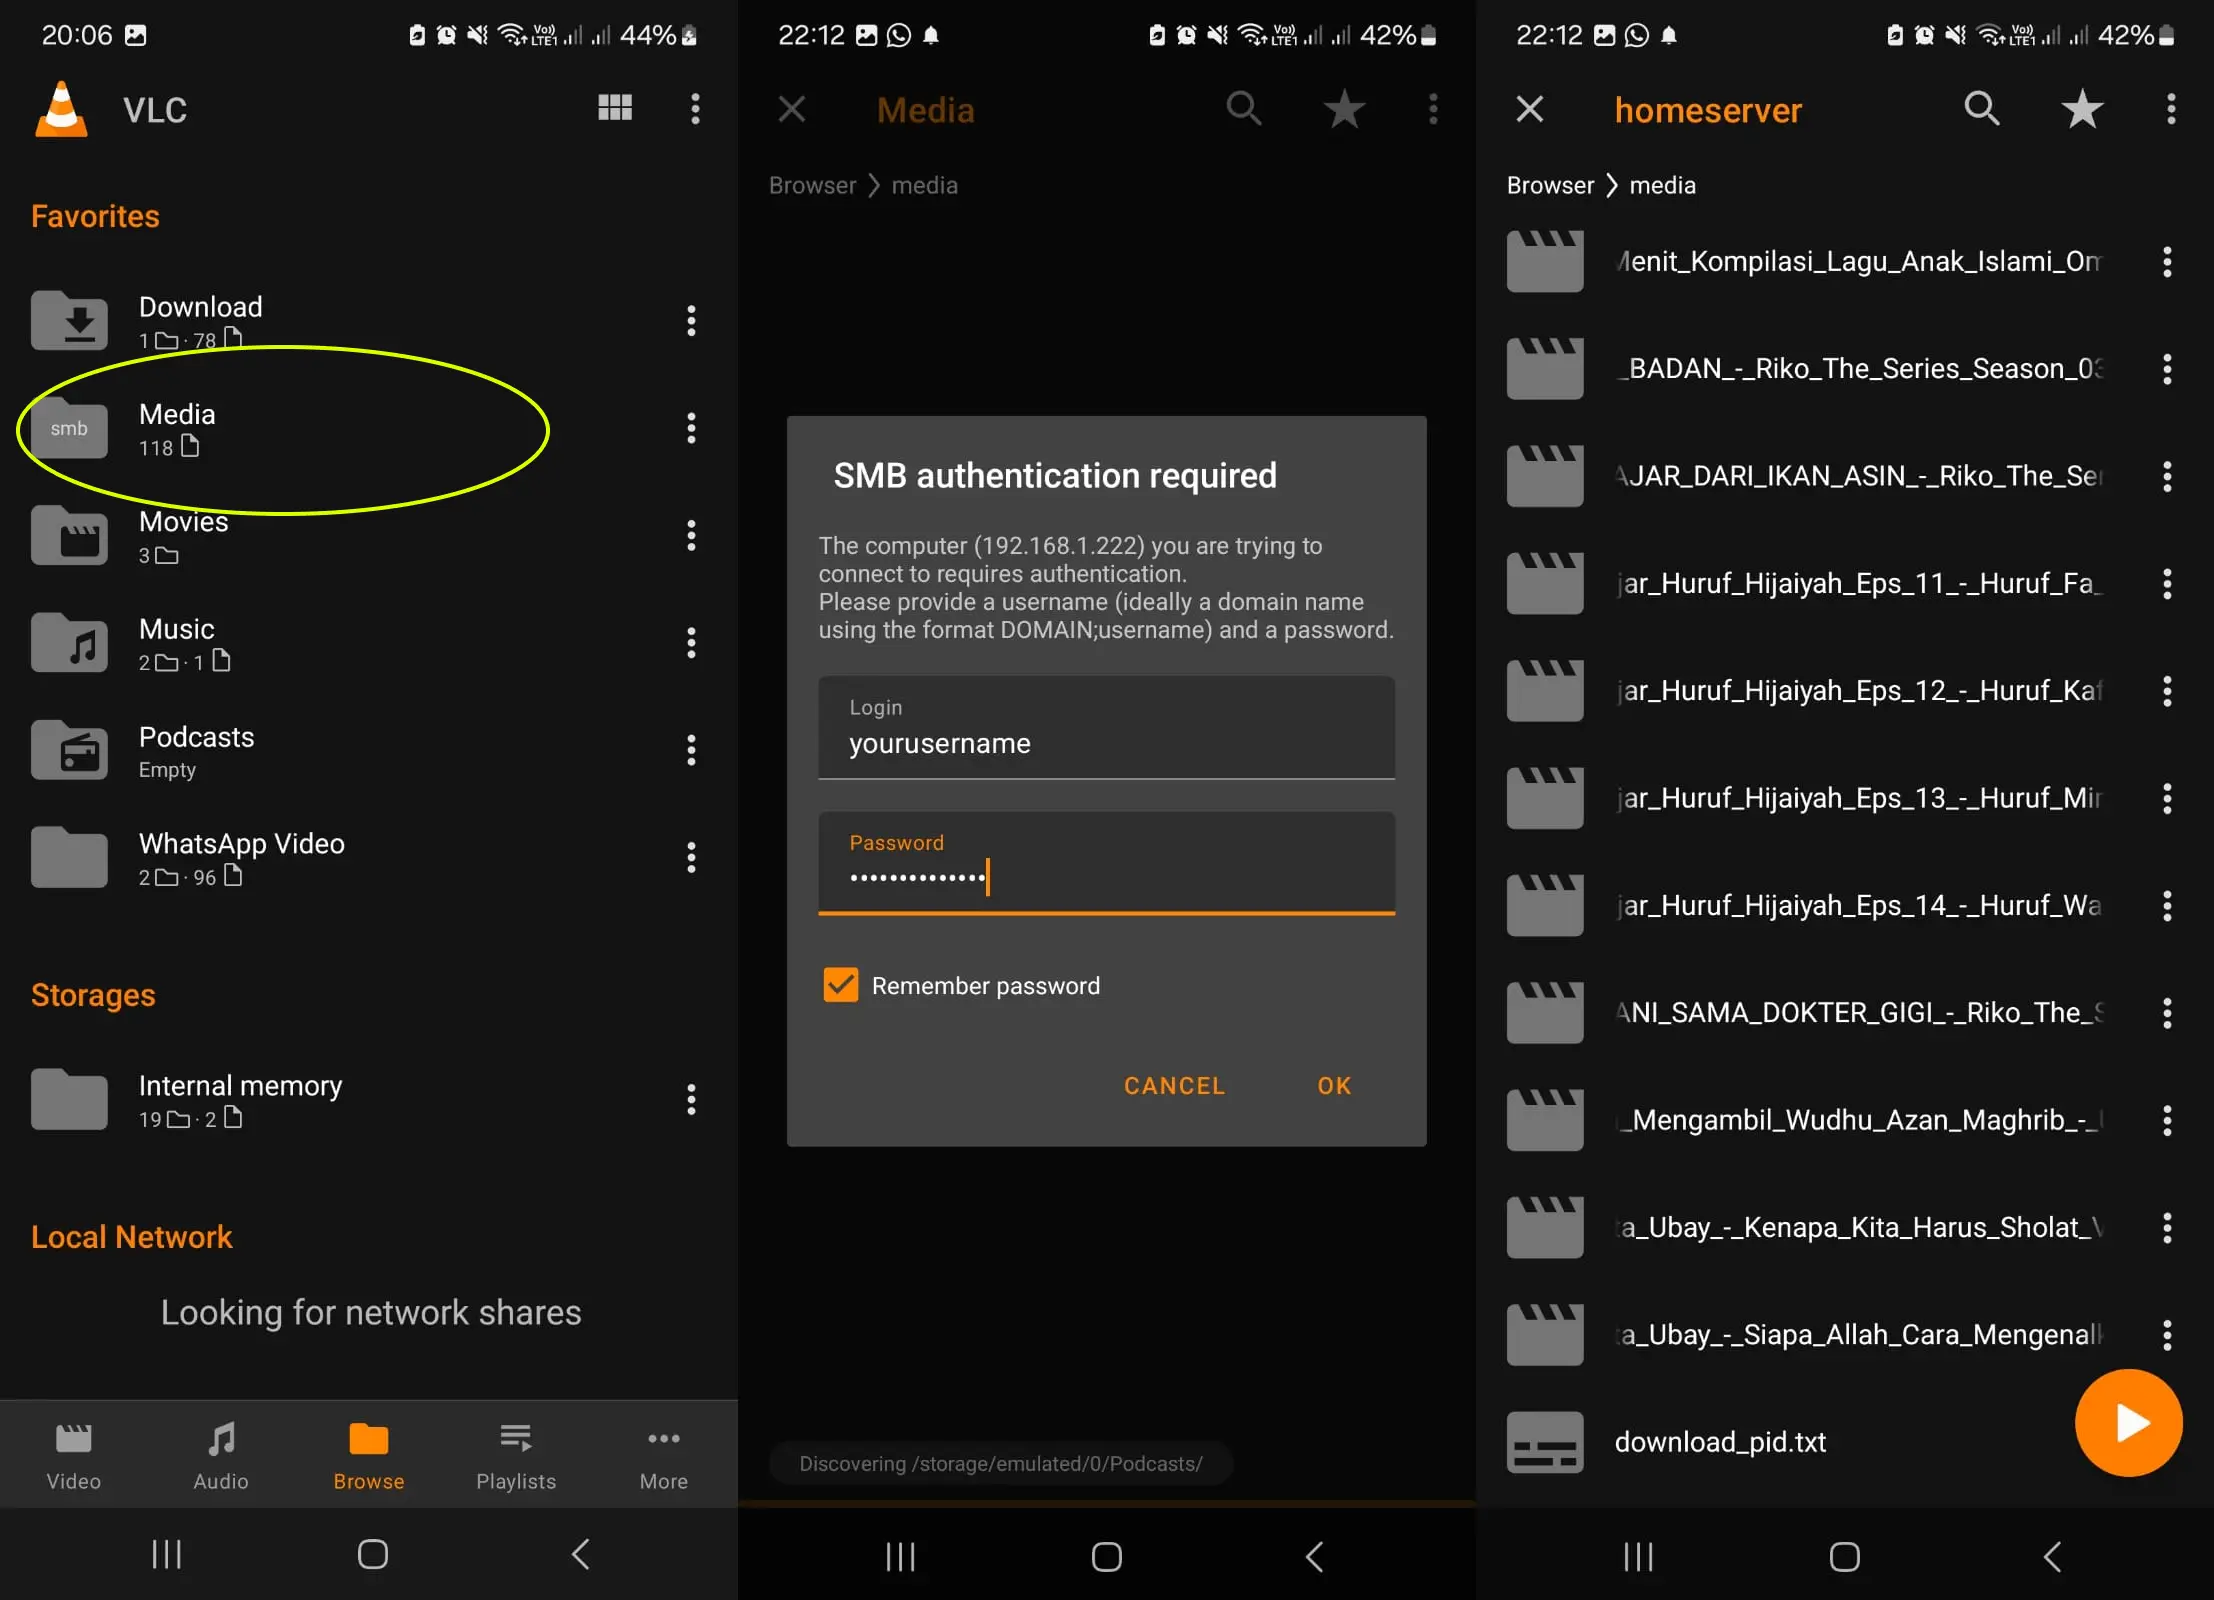
Log in to the Server
The final step is logging into the configured Samba server. Click the favorite server you created, then enter the password from the SAMBA_PASSWORD configuration and click OK. The videos or media on the server should now appear and be ready to play.
Bonus: How to Batch Download YouTube Videos
I use this media server to play pre-downloaded YouTube videos. Instead of downloading them one by one, I copy the URLs of the videos I want and save them in a text file. Then, I create a script to automatically download each video.
First, install the yt-dlp module on the server by following the instructions in the documentation. Once installed, navigate to the directory where the media files are stored and create a new file named youtube_urls.txt containing the URLs of the videos you want to download:
https://youtube.com/watch?v=sSneQbtznCI
https://youtube.com/watch?v=9fqDgK3drhw
https://youtube.com/watch?v=Ix4ajTSf7dg
https://youtube.com/watch?v=UBswtBkT3Ew
In the same directory create a new file named ytdl.sh, containing the following script.
#!/bin/bash

file_name="youtube_urls.txt"

download_videos() {
    while IFS= read -r url; do
        echo "Downloading: $url"
        yt-dlp -f "bv*[height<=720][ext=mp4]+ba*[ext=m4a]" -N 4 "$url" --output "%(title)s.%(ext)s" --restrict-filenames || echo "Error downloading $url, continuing to next URL"
    done < "$file_name"
    echo "All downloads completed."
}

download_videos
Adjust the resolution of video downloaded by changing number on this line height<=720 to 1080 or 1440. Don't forget, provide execution access for the script with the command
chmod +x ytdl.sh
Run the following command to start downloading.
./ytdl.sh
Reference
https://medium.com/devops-technical-notes-and-manuals/how-to-run-docker-commands-without-sudo-28019814198f https://reintech.io/blog/installing-docker-on-almalinux-9